Monday, September 21, 2009
Knowing and Understanding Vector Shapes
Hello,
In Photoshop, we can use the Vector Shapes tools to create an object for placement on our image. Vector Shapes are created based on mathematical calculations rather than a specific number and pattern of pixels, this allows them to be resized pixelated. Every time a vector shape is changed in any way, Photoshop redraws the image, filling in pixels as necessary therefore, no quality is lost.
The Vector Shape tools include the Rectangle tool, the Rounded Rectangle tool, the Ellipse tool, the Polygon tool, the Line tool, and the Custom Shape tool.The Custom Shape tool lets you select without causing the image to become jagged or
Creating A Vector Shape
Step I - Select a Vector Shape tool. The Vector Shape tools are located directly under the Type Tool in the Toolbox. The icon that appears in the location of the Toolbox corresponds to the last Vector Shape tool that you used. Click on the tool to select that shape, or hold down the mouse button and select a different shape from the fly-out menu. Once a Vector Shape tool is selected, the Options Bar will display a palette of the various shapes available.
Click on the desired tool if its not already selected.
Step II - Select the shape you want. If you have selected the Custom Shape tool, click the Shape pull-down menu in the Options Bar and the select the desired shape.
The circle button with the black arrow provides a fly out menu with more shape options.This menu lets you load more shapes, save modified shapes, delete shapes, rename shapes and reset shapes to Photoshop's defaults (among other things). The bottom grouping is a list of other shape families that you can use if you wish.
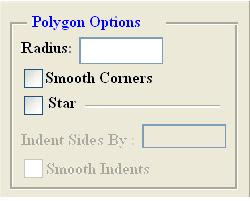
Step III - Choose the options you want for your shape. By clicking the down-arrow to the right of the palette of shapes on the Options Bar, you will see the the Options dialog box for the currently selected shape. Each shape has different options based upon what can be done with that shape. Below are the Options dialog boxes for each vector shape.
Step IV - Draw the shape : If you have selected a shape with defined or fixed size, simply click the mouse button on the image and the shape will appear. Otherwise, drag the mouse to draw the shape.
Photoshop automatically creates a new shape layer a new shape layer for the first shape drawn, subsequent shapes can be drawn on the same layer. In order to create shapes on different layers, you must create the additional layers and make sure the correct layer is selected before creating additional shapes.
Step V - Edit the shape : To change the fill color of a Vector Shape, simply double - click on the color box on that shape's layer. The color picker will appear and the fill color can then be changed.
In Photoshop, we can use the Vector Shapes tools to create an object for placement on our image. Vector Shapes are created based on mathematical calculations rather than a specific number and pattern of pixels, this allows them to be resized pixelated. Every time a vector shape is changed in any way, Photoshop redraws the image, filling in pixels as necessary therefore, no quality is lost.
The Vector Shape tools include the Rectangle tool, the Rounded Rectangle tool, the Ellipse tool, the Polygon tool, the Line tool, and the Custom Shape tool.The Custom Shape tool lets you select without causing the image to become jagged or
Creating A Vector Shape
Step I - Select a Vector Shape tool. The Vector Shape tools are located directly under the Type Tool in the Toolbox. The icon that appears in the location of the Toolbox corresponds to the last Vector Shape tool that you used. Click on the tool to select that shape, or hold down the mouse button and select a different shape from the fly-out menu. Once a Vector Shape tool is selected, the Options Bar will display a palette of the various shapes available.
Click on the desired tool if its not already selected.
Step II - Select the shape you want. If you have selected the Custom Shape tool, click the Shape pull-down menu in the Options Bar and the select the desired shape.
The circle button with the black arrow provides a fly out menu with more shape options.This menu lets you load more shapes, save modified shapes, delete shapes, rename shapes and reset shapes to Photoshop's defaults (among other things). The bottom grouping is a list of other shape families that you can use if you wish.
Step III - Choose the options you want for your shape. By clicking the down-arrow to the right of the palette of shapes on the Options Bar, you will see the the Options dialog box for the currently selected shape. Each shape has different options based upon what can be done with that shape. Below are the Options dialog boxes for each vector shape.
Step IV - Draw the shape : If you have selected a shape with defined or fixed size, simply click the mouse button on the image and the shape will appear. Otherwise, drag the mouse to draw the shape.
Photoshop automatically creates a new shape layer a new shape layer for the first shape drawn, subsequent shapes can be drawn on the same layer. In order to create shapes on different layers, you must create the additional layers and make sure the correct layer is selected before creating additional shapes.
Step V - Edit the shape : To change the fill color of a Vector Shape, simply double - click on the color box on that shape's layer. The color picker will appear and the fill color can then be changed.
Labels:
adobe,
adobe photoshop,
butterfly,
HTML,
photoshop CS2,
shapes,
Vector shapes,
Web designing
Saturday, September 19, 2009
Using The Color Picker
Hello,
To display Adobe's Color Picker, click on either the foreground or background color in the toolbox. The color picker dialog box, shown below, allows you to select a very specific shade, either by visually choosing it or by defining the color numerically.
Visually - The initial white circle is the current color. Drag the little triangles on the vertical color slider to change the range of colors displayed, then click on the desired shade to select it.
Numerically - Enter the correct color code in the RGB, CMYK, HSB, Lab, or Hexadecimal (Web) text boxes.
When the 'ONLY WEB COLORS' box is checked in the bottom left - hand corner of the dialog box, Photoshop will only display colors that will properly display on the World Wide Web:
When you are satisfied with your selected color, click the OK button to return to the image.
Pull down the Book menu to select the desired color system. Scroll though the available colors using the color slider on the right, then click on the color you want. Click OK to return to you image, or click Picker to return to the Adobe Color Picker dialog box.
Thanks For Reading!!!!
Hope you will be back for more updates on Photoshop!!
:)
Thursday, September 17, 2009
Creating A New Image And Color Section
Hello,
To create a new image, select File -->New, or press N
A dialog box pop up prompting you to define five general elements for creating a new image.
* Name the image now. (or later, when you save the image)
* Predetermine the size of the image
* In our working, we'll stay with the RGB (Red Green Blue) color mode, which
offers general colors. There are also other preset odes that offer difficult
schemes such as grayscale.
* The contents section allows you to decide what will be the initial background color of the new image. (Set to Transparent or to White)
Before we start drawing or editing we should first learn about the color selections in Photoshop :
Understanding Color Selection
To create a new image, select File -->New, or press
A dialog box pop up prompting you to define five general elements for creating a new image.
* Name the image now. (or later, when you save the image)
* Predetermine the size of the image
* A resolution of 72 ppi (pixels per inch) is generally used for Internet purposes.
Anything higher than that can be used for images requiring high quality, such as
those required for print or video.
Anything higher than that can be used for images requiring high quality, such as
those required for print or video.
offers general colors. There are also other preset odes that offer difficult
schemes such as grayscale.
* The contents section allows you to decide what will be the initial background color of the new image. (Set to Transparent or to White)
Before we start drawing or editing we should first learn about the color selections in Photoshop :
Understanding Color Selection
Color selection is the act of picking the color that you want to use as a part of your image.At a time, Photoshop remembers two colors for you: the foreground color and the background color. The foreground color is used to make gradients and fill in the erased areas of an image.
There are several ways in Photoshop to change the foreground and background colors, we'll cover the most common methods here.
USE THE DEFAULT COLORS. Clicking the 'set default colors' button on the toolbox. This will set the foreground color to black and the background color to white.
SWAP THE BACKGROUND AND FOREGROUND. Clicking the small curved arrow on the toolbox will reverse the foreground and background colors.
USE THE EYEDROPPER TOOL TO SAMPLE A COLOR. The eyedropper tool, located on the toolbox, allows you to simply click on a color in an open image to select it as the foreground color.To set the background color, hold down the ALT key when you click. When using a painting tool, you can temporarily turn the cursor into the Eyedropper tool by holding down the Alt key. When you release the Alt key, the cursor turns back into the previous panting tool.
Friday, September 11, 2009
Codes for Colors
Hello,
Today I will be telling the codes of color in HTML.The main colors are RED, Green, and Blue. There are 16 widely known color names defines in HTML. These name and thier associated HEX RGB values are shown below -:
Aqua-#00FFFF
Black - #000000
Blue - #0000FF
Fuchsia - #FF00FF
Gray -#808080
Green -#008000
Lime -#00FF00
Maroon -#800000
Navy -#000080
Olive -#808000
Purple - #800080
Red -#FF0000
Silver -#C0C0C0
Teal - #008080
White - #FFFFF
Yellow - #FFFF00
There are many more colors and hex values.
Thursday, September 10, 2009
Understanding Layers
Hello,
Layers are like transparencies stacked one on top of one another. Each layer can have different images and effects. When the layers are stacked, the images appear as if they are all a single image.
The example here contains three layers: the background yellow layer, the red circle layer and the green rectangle layer. If, for example, the circle in the image was in the wrong place , you could easily change its location by selecting the circle layer and moving the circle without affecting the rest of the images.
Thanks for reading!!!
Wednesday, September 9, 2009
Knowing Palettes
Hello,
Want to know what are palettes in photoshop??
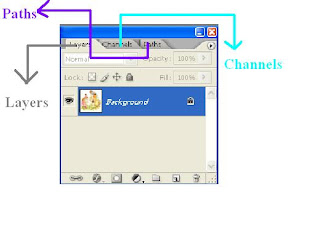
Palettes are areas where features or settings for tools are found. This is where you can fine-tune the functions of the tools.The palettes are located under the Window menu. They include history, actions, navigator, information, color, swatches, styles, paths, channels,layers etc. As shown in the figures.
The default layout that is displayed when you first open Photoshop displays 11 out of the 12 avalible palettes in four floating windows.Each one has its own tab.
We can arrange and reposition the avalible palettes either individually or in groups. The floating palette system incorporated into Photoshop allows you to drag each palette away from the existing cluster to create a seprate window for that palette. The reverse is also true.We can cluster individual palette tabs into groups of our own preference.
Subscribe to:
Posts (Atom)