Wednesday, November 25, 2009
Using the Magnetic Lasso Tool:
So today I am going to tell you guys how to use the magnetic lasso tool. Follow the steps below and you will be perfect!
Step 1: Select the Magnetic Lasso Tool from the Toolbar.
Step 2: Set any desired option from the options bar.
Step 3: Click to set the first endpoint of the selection.
Step 4: To draw a freehand segment, move the mouse pointer along the edge you want to trace. (You don't have to hold down the mouse button, although you can if you like.)
Step 5: As you move the pointer, the selection will automatically snap to the strongest edge in the area around the pointer, based on the Width set in the Options Bar. Periodically, intermediate points are added to the selection border. While tracing the edge, click to add a point if needed.
Step 6: If you want to switch to either the regular Lasso Tool or the Polygonal Lasso Tool, hold the Alt key. At this point, dragging the mouse will let you draw freehand borders add clicking will let you draw straight-line segments.
Step 7: Close the selection border by double-clicking the mouse.
So I hope you understood well, if you have any problems don't hesitate just leave a comment and I will help you back!
Thursday, October 15, 2009
Selection And Modification Tools In Photoshop
src="http://pagead2.googlesyndication.com/pagead/show_ads.js">
Hello,
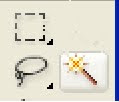
Today Harry told me that he wanted know how what are selection and modification tools in photoshop and how to use them. I told him what types of tools they are and where to use them. He got to very impressed that he wants to learn more. I explained him that photoshop provides three simple tools for selection: Marquee, Lasso and Magic Wand. They are located on he top of the toolbar. In addition, you can use commands on the Select menu.
The selection tools allow you to select a portion or a subset of an
image to work on. Most of Photoshop's other tools and filters can then be applied to this selected area, altering its color, shape, texture, position and/or other attributes, while leaving the rest of the image untouched.
The Marquee Tools are used to select a specific regularly shaped area. The marquee tools include the Rectangular, Elliptical, Single Row and Single Column Marquees.
The Lasso Tools are used to select an irregular area. These tools include the Lasso Tool, the Polygonal Lasso Tool and the Magnetic Lasso Tool.
The Magic Wand is used to select areas of an image based upon color. The Magic Wand does not have additional tools.
All of the selection tools may be used individually or in conjunction with each other to select exact areas of images. The Options Bar allows you to choose to add to or subtract from a previous selection.
If you choose New Selection, any currently active selection will go away.
If instead you would like to add to the current selection, or subtract from it, make that choice in the Options Bar. You can even choose to select an area formed by the intersection of your selections.
Thanks For Reading!!
Friday, October 9, 2009
Selecting Gradient Colors
Harry asked me that he was not able to understand the concept of how to select the gradient colors. I told him that you now how to select the gradient tool, (refer to the previous blogs)the gradient options appear on the Options Bar. The color bar allows you to set the, gradient colors. If you click on the pull down menu, you
you can select any of the displayed color combination. (If you hold your mouse over any of the choices, you will see a text description of it.) The upper left hand corner always displays the default combination, a gradient from the foreground color to the background color. By setting your foreground and background colors on the toolbox, you can easily define your own simple gradient.
The circle button with the black arrow (circled in red here) provides a fly-out menu with more gradient options. This menu lets you load more gradients, save modified gradients, gradients shapes, rename gradients and reset the gradient selection to Photoshop's default values. The bottom grouping is a list of other gradients families that can be used if desired by the user.
Editing Gradient Colors
If you want to make changes in one or more of the colors in your chosen gradient, you can click on it the options bar to open the Gradient Editor dialog box. For example, clicking on this gradient.
This will display this Gradient Editor dialog box :
The Color Stops appearing below the gradient marks of the each colors in the gradient. To change a color, double click on its Color Stop; the color picker will open, allowing you to select a new color. You can also add more Color Stops by clicking between the existing Stops. To remove a color, simply drag its Color Stop away from the gradient.
Saving an Image
Now that you've changed the image, let's save it: select Save from the File menu. Photoshop should select the directory from which the image was loaded and should choose Photoshop's PSD file format as the image format.
Thanks For Reading!!
Sunday, October 4, 2009
Knowing Gradient Styles
Yesterday Bella told me that she is very confused with various types of Gradient styles.Then I told her in a simple way that when the Gradient tool is selected, a series of five style buttons appear on the Options Bar:
These buttons represent various gradient styles:
* Linear * Radial *Angular *Reflected * Diamond
The description of each style, with an example of which is shown below. To help you visualize how each gradient was
created, the mouse action is superimposed on the gradient:
* The black triangle indicates the center point.
* The dashed line indicates the selection line.
* The red triangle indicates the end point.
In each case, the mouse was dragged from the center point along the selection line to the end point, then released.
The Linear Gradient- This option can create vertical, horizontal and diagonal gradient.
For vertical gradients, draw a horizontal selection line (that is, drag the mouse left to right or vice verse)
For horizontal gradients, draw a vertical selection line (that is, drag the mouse up or down)
For diagonal gradients, draw a diagonal selection line (that is drag the mouse diagonally)
The Radial Gradient - This option creates circular gradients. Start the mouse drag at the point where you want the center of the gradient to be ; release the mouse button where you want to the outermost circle of the gradient to be.
The Angular Gradient - This option creates a circular sweep of blended color. Think of it as a clock face with a sweep second hand that the gradient flows from as it goes around. Start the mouse drag where you want the center of the clock free to be, drag the selection line as if you were drawing the starting point of the clock's second hand. When the mouse is released, the second hand sweeps counter-clockwise around the center point and stops when it returns to where it began. The sweep begins with the left-most color on the color bar and ends up with the right-most color.
The Reflected Gradient - This option works the same way as the Linear Gradient, but it creates a mirror image as well. In other words, when you create the selection line, the gradient flows out in both directions from the center point, rather that just in the direction you drag the mouse.
Thursday, October 1, 2009
Gradients In Photoshop
Yesterday Jake told me that he wanted to create a picture in which he could fill two or more colors but didn't knew that how is that possible. I then told him that is very easy in Photoshop using Gradients. He now got confused and asked what are gradients. I told him that a gradients is a fill
consisting of two or more colors blending together. I showed him this picture which is a simple example of a gradient, which is beginning with blue and ending with yellow:
He now got so very curious to know more about gradients that he asked me if I could tell him very thing about gradients.
So I told him that we will learning step by step. I started telling him how to create a gradient.
To Create A Gradient:
Step 1: Click on the Gradient tool. The Gradient tool is grouped together with Paint Bucket Tool in the toolbox. If the Gradient Tool is not shown in the Toolbox, simply point to the Paint Bucket Tool, press down the mouse button and select the Gradient Tool from the fly-out menu
Step 2: Select your style options. When the tool is selected, the Gradient options appear on the Options Bar. The buttons represent various available gradient styles.
Click the button for the style you want.
Step 3: Make your color selections. When the tool is selected, the Gradient options appear on the Options Bar. The color bar lets you choose the the gradient colors:
Select the colors you want.
Step 4: Indicate which layer you want. In the Layers Palette, select the layer on which you want to paint.
Step5: Select an area to fill. Using the selection tools, select the area of layer you want to fill.
Step 6: Draw the gradient. Point with the mouse to where you want the blending to begin (the center point), then drag the mouse to where you want the blending to end (the end point). This line is referred to as the selection line.
The area you selected in step 5 will fill with the gradient. The center point is always the left-most color on the color bar, the end point is always the right-most color on the color bar and the gradient is drawn in between.
Monday, September 21, 2009
Knowing and Understanding Vector Shapes
In Photoshop, we can use the Vector Shapes tools to create an object for placement on our image. Vector Shapes are created based on mathematical calculations rather than a specific number and pattern of pixels, this allows them to be resized pixelated. Every time a vector shape is changed in any way, Photoshop redraws the image, filling in pixels as necessary therefore, no quality is lost.
The Vector Shape tools include the Rectangle tool, the Rounded Rectangle tool, the Ellipse tool, the Polygon tool, the Line tool, and the Custom Shape tool.The Custom Shape tool lets you select without causing the image to become jagged or
Creating A Vector Shape
Step I - Select a Vector Shape tool. The Vector Shape tools are located directly under the Type Tool in the Toolbox. The icon that appears in the location of the Toolbox corresponds to the last Vector Shape tool that you used. Click on the tool to select that shape, or hold down the mouse button and select a different shape from the fly-out menu. Once a Vector Shape tool is selected, the Options Bar will display a palette of the various shapes available.
Click on the desired tool if its not already selected.
Step II - Select the shape you want. If you have selected the Custom Shape tool, click the Shape pull-down menu in the Options Bar and the select the desired shape.
The circle button with the black arrow provides a fly out menu with more shape options.This menu lets you load more shapes, save modified shapes, delete shapes, rename shapes and reset shapes to Photoshop's defaults (among other things). The bottom grouping is a list of other shape families that you can use if you wish.
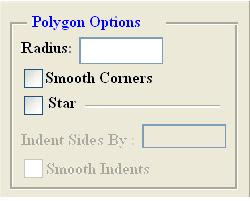
Step III - Choose the options you want for your shape. By clicking the down-arrow to the right of the palette of shapes on the Options Bar, you will see the the Options dialog box for the currently selected shape. Each shape has different options based upon what can be done with that shape. Below are the Options dialog boxes for each vector shape.
Step IV - Draw the shape : If you have selected a shape with defined or fixed size, simply click the mouse button on the image and the shape will appear. Otherwise, drag the mouse to draw the shape.
Photoshop automatically creates a new shape layer a new shape layer for the first shape drawn, subsequent shapes can be drawn on the same layer. In order to create shapes on different layers, you must create the additional layers and make sure the correct layer is selected before creating additional shapes.
Step V - Edit the shape : To change the fill color of a Vector Shape, simply double - click on the color box on that shape's layer. The color picker will appear and the fill color can then be changed.
Saturday, September 19, 2009
Using The Color Picker
To display Adobe's Color Picker, click on either the foreground or background color in the toolbox. The color picker dialog box, shown below, allows you to select a very specific shade, either by visually choosing it or by defining the color numerically.
Visually - The initial white circle is the current color. Drag the little triangles on the vertical color slider to change the range of colors displayed, then click on the desired shade to select it.
Numerically - Enter the correct color code in the RGB, CMYK, HSB, Lab, or Hexadecimal (Web) text boxes.
When the 'ONLY WEB COLORS' box is checked in the bottom left - hand corner of the dialog box, Photoshop will only display colors that will properly display on the World Wide Web:
When you are satisfied with your selected color, click the OK button to return to the image.
Pull down the Book menu to select the desired color system. Scroll though the available colors using the color slider on the right, then click on the color you want. Click OK to return to you image, or click Picker to return to the Adobe Color Picker dialog box.
Thanks For Reading!!!!
Hope you will be back for more updates on Photoshop!!
:)
Thursday, September 17, 2009
Creating A New Image And Color Section
To create a new image, select File -->New, or press
A dialog box pop up prompting you to define five general elements for creating a new image.
* Name the image now. (or later, when you save the image)
* Predetermine the size of the image
Anything higher than that can be used for images requiring high quality, such as
those required for print or video.
offers general colors. There are also other preset odes that offer difficult
schemes such as grayscale.
* The contents section allows you to decide what will be the initial background color of the new image. (Set to Transparent or to White)
Before we start drawing or editing we should first learn about the color selections in Photoshop :
Understanding Color Selection
There are several ways in Photoshop to change the foreground and background colors, we'll cover the most common methods here.
USE THE DEFAULT COLORS. Clicking the 'set default colors' button on the toolbox. This will set the foreground color to black and the background color to white.
SWAP THE BACKGROUND AND FOREGROUND. Clicking the small curved arrow on the toolbox will reverse the foreground and background colors.
USE THE EYEDROPPER TOOL TO SAMPLE A COLOR. The eyedropper tool, located on the toolbox, allows you to simply click on a color in an open image to select it as the foreground color.To set the background color, hold down the ALT key when you click. When using a painting tool, you can temporarily turn the cursor into the Eyedropper tool by holding down the Alt key. When you release the Alt key, the cursor turns back into the previous panting tool.
Friday, September 11, 2009
Codes for Colors
Today I will be telling the codes of color in HTML.The main colors are RED, Green, and Blue. There are 16 widely known color names defines in HTML. These name and thier associated HEX RGB values are shown below -:
Aqua-#00FFFF
Black - #000000
Blue - #0000FF
Fuchsia - #FF00FF
Gray -#808080
Green -#008000
Lime -#00FF00
Maroon -#800000
Navy -#000080
Olive -#808000
Purple - #800080
Red -#FF0000
Silver -#C0C0C0
Teal - #008080
White - #FFFFF
Yellow - #FFFF00
There are many more colors and hex values.
Thursday, September 10, 2009
Understanding Layers
Layers are like transparencies stacked one on top of one another. Each layer can have different images and effects. When the layers are stacked, the images appear as if they are all a single image.
The example here contains three layers: the background yellow layer, the red circle layer and the green rectangle layer. If, for example, the circle in the image was in the wrong place , you could easily change its location by selecting the circle layer and moving the circle without affecting the rest of the images.
Thanks for reading!!!
Wednesday, September 9, 2009
Knowing Palettes
Want to know what are palettes in photoshop??
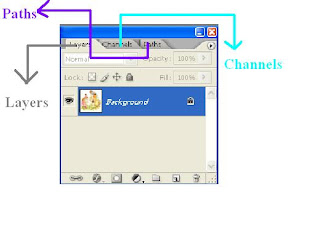
Palettes are areas where features or settings for tools are found. This is where you can fine-tune the functions of the tools.The palettes are located under the Window menu. They include history, actions, navigator, information, color, swatches, styles, paths, channels,layers etc. As shown in the figures.
The default layout that is displayed when you first open Photoshop displays 11 out of the 12 avalible palettes in four floating windows.Each one has its own tab.
We can arrange and reposition the avalible palettes either individually or in groups. The floating palette system incorporated into Photoshop allows you to drag each palette away from the existing cluster to create a seprate window for that palette. The reverse is also true.We can cluster individual palette tabs into groups of our own preference.
Friday, August 21, 2009
Photoshop Interface
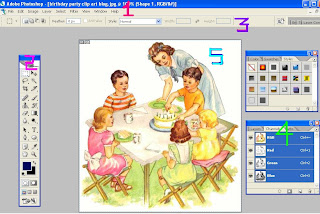
1. Menu Bar: From here, you can access
of the commands and features in
2. Toolbox: It has various tool for editing
3. Options Bar: It sets the options for the
5. Image Area: The area where images are opened and appeared.
The toolbox contains all of the various Photoshop tools. In addition to the visible tools, the tools with a small black arrow in the lower-right corner contain fly-out menus with other related tool choices. The example to the left shows the Brush Tool is depressed, displaying the Brush Tool and the Pencil Tool in the fly-out menu.
Thursday, August 6, 2009
Introduction To Photoshop
Now Jack asked me a question that what is photoshop??
I told him that photoshop is used for creating and modifying images for the web and for other media applications. Traditionally, photoshop is a professional image editinf software package that can be used by the experts.But not only experts,routine computer uses can handle this software.This is true that after four generations of development, Adobe Photoshop has the user-freindly interface with complete set of tools.
Harry had a question that what can we do with photoshop??
I told him that we can use photoshop to 'alter' images like photos,downloaded icons, or scanned artwork.
Altering an image includes changing the colors within an image,modifying the size and scale of an image or putting one picture 'within' another.
But, besides altering images, Photoshop has a variety of tools that help you to create images from scratch.
On the web, you often need to make custom icons, buttons, lines, balls or text art. Photoshop makes all of this quite easy.
Jack and Harry got so impressed that they would like to know more about Photoshop.Hope you also what to learn more about Photoshop.If you are interested then you are most welcomed and Thanks for reading.
Breaking Text Apart
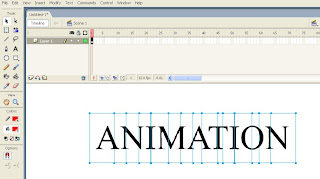
Step 1: Create a plain text using text tool in Flash, say a text 'ANIMATION'.
Step 2: Select the Selection tool and click a text block.
Step 3: Select Modify --> Break Apart (Ctrl + B).Each character in the selection text is placed in a separate text block.The text remains in the same poition on the Stage.
Step 4: Select the text block one by one and change their colors.
Friday, July 17, 2009
Using Tween To Animate
Creating an animation by using frame-by-frame technique requires lot of work and attention because we have to draw every frame on our own .The term 'Tweening' means 'in between'.Tweening simply means going from one keyframe to another while taking small steps for each of the frames in between.
Flash has three types of Tweenings:
Motion Guide Tweenings:Moving objects from A to B along a customized path.
Tint Tweening:Graduated color changing an object.
Shape Tweening:Graduated change of one object into another.
So now I shall be telling you about what is motion guide.
Motion Guide meand moving you symbol in a predefined path such as curves or circles.I shall now tell you how to move Flash objects in circular,zig zag or curved paths using Flash motion guide.
For example you have to make a bird fly using a motion guide.
Step 1: Draw a ird or import it.
Step 2: Convert it to the symbol and delete it from the stage.
Move it to the library Panel.
Step 3: Drag a copy of bird to the stge.
Step 4: To enter a keyframe in frame 30.First click frame 30 in layer one on the timeline and then press F6.
Step 5: Right Click on frame 1 and choose Create Motion Tween.
Step 6: Right click on Layer 1.A pop-up menu appears.Flash now inserts a new layer on the top of layer 1,with the Motion Guide icon to the left of the layers name.
Step 7: Clixk on the Motion Guide Layer to make sure it is the active layer.
Step 8: Choose pencil from the toolbox. Make sure pencil mode is set to 'Smooth'.
With the pencil draw the line you want the bird to fly along.
Step 9: Now adjust the frame pointer ao that it points to frame 1.
Step 10: With the mouse, place the bird so that its center is at the neginning of your motion guide.(The center is indicated by a small + when selected). A black circle appears when the bird is attached to the motion guide.
Try zooming in or out if you just ant get the bird to snap to the guide.
Release the mouse button when the bird is snapped to the guide.
Step 11: Click from frame 30 and position the bird at the end of the motion guide just as you did in frame 1.
WOW!Congrats you have just created a motion giude tweening.The bird will now follow the motion guide when you play the movie.
Hope you understood everything that I told you.If you have any quires you can leave a comment or e-mail me at ranibhardwaj31@gmail.com .I will surly replay your quires.
Take Care and Thanks for reading!
Friday, July 10, 2009
Using Onion Skin Tool
So today I will be teching you about how to use onion skin tool.Onion Skinning allows you to see a faint ghost image of the previous framee so you can see where you want to place the artwork for the next frame.This feature lets you to edit one keyframe while viewing as many frames before or after the current frame as you want.
Creating an Animation by using Onion Skin
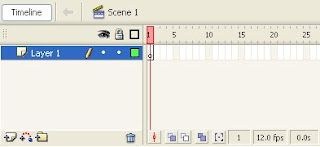
Step 1:Start a New File and set Frame view to large.
Step 2:Turn on Onion Skin.Notice that the Start and End Onion Skin makers.
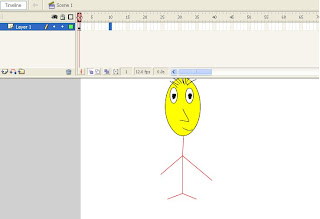
Step 3: Draw a Stick man which is shown below.
Step 4: In frame 2, Select Insert -->Keyframe,this will copy what was in the previous frame and paste in into the new keyframe.
Step 5: While editing frame 2,drag the end of one leg to move it to a different angle.This time,the position of the leg from frame 1 is visible but we can edit the contents of frame2.
Step 6: In frame 3,insert another keyframe. When you move the leg ,you can judge how much leg to the moved,based on the position of the leg in frame 2.
Step 7:Continue to insert keyframes one at a time. Make change in each new frame , then select Insert --> Keyframe again.
Step 8: When you have several frames, you can experiment with changing the both Start and End Onion Skin markers. By default, the markers are set to Onion 2 , meaning you can see two frames ahead and two behind.
So I hope you got to know how use Onion Skinning in Flash.If you have any problems in onion skinning you can leave a comment or e-mail me at ranibhardwaj31@gmail.com.
Thanks for reading.
Tuesday, June 30, 2009
Creating Animations
In flash we create animations by changing the content of successive frames.We can make an object move across the stage,increase or decrease its size,rotate,change color,fade in or out,or change shape.Changes can occur independently or simultaneously with other changes.For example,you can make an object rotate and fade in as it moves across the stage.
There are two methods for creating an animation sequence in Flash:
*Frame-by-frame Animation.
*Tween Animation.
Frame By Frame Technique To Animate
In frame by frame animation you create the image in every frame.
Aim:To make a quick animation of flying an airpalne across the Stage.
Step1:Draw a airplane or import it.Convert it into the Symbol.
Step2:Single click to the right of the keyframe dot in layer 1 and then click in the second frame of layer1
Step3:Click Insert -> Insert Keyframe or press F6,which inserts a keyframe in frame 2 with a copy of the airplane.
Step4:Make a slight change in the position of an airplane towards right of the stage.Here you should be sure that you are presently in the frame 2,if not then click in frame 2 of the Timeline.
Step5:Now we create the third frame,click in layer 1 right after frame 2 and press F6 which copies the contents of frame2 into the new keyframe in frame 3.
Step6:Make a slight change in the position of an airplane towards the right of the stage.Check that the change in position is done in the frame 3.
Step7:Continue to insert keyframes one at a time.
Previewing Animation.
The best way to view animatin is though Control -> Test Movie
Test Movie exports .swf file in the foler where our file is saved.Now our folder will have one additional .swf file.Go to the folder and double-click the .swf file this will lunch the Flash Player programe for you to view the result.
Hope you understood whatever I told you in this blog.I shall be telling you about How to use the onion skin tool in my next blog till then take care.
Thanks for reading!!
Monday, June 29, 2009
Knowing Symbols and Instances
One of the great things about Flash is that it allows you to create a graphic once use it over and over again.This allows your Flash animation to download faster.
Now many of you must be thinking that what are symbols.Symbols are reusable elements and can be put in the library.In order to animate something in Flash it must be first changed into a Symbol.So the next question arises what are instances.When we place a symbol on the stage from the library it is called an instance of that symbol.
Creating Symbols.
Aim:Draw a fish.Converting a fish into a symbol and place in the library.
Step1:Select the fish by pressing Ctrl+A.
Step2:Group it by pressing Ctrl+G
Step3:Select Insert -->Convert to Symbols or Press F8
Symbol Properties dialog box will appear:
By default the behavior is on 'Movie Clip'.It is right option because some time we are not sure which behavior is the best.Button behavior is selected when we are creating action buttons.Graphics behavior is used for synchronization applications.
Step4:Name you symbol 'Fish',click that it's a Graphic and pick a registration point.
What is a Registration Point??
This is the point that you would use as the 'center' if you want to rotate the Symbol.
Step5:Click OK
Step6:Press CTRL+L to open the library window and notice one symbol 'FISH' in the library.
Step7:Delete the fish from the stag and drag it from the library for the use.
Try This!!
Draw an airplane in Macromedia Flash and convert it into a symbol.
Hope you will try this and if you are not able to do this excercise you can leave a comment or e mail me at ranibhardwaj31@gmail.com and ask your queries.I will surly repay them.Thanks for reading
Sunday, June 28, 2009
Understanding Animations in Flash
Today I will be telling you about Animations in Flash.Now many of you must be thinking that what is animation and what does it mean.Animation is made from individual images.It is a collection of still images,but motion is created with the help of animations.When we watching any action of an object,at the time of blinking of our eyes,our brain covers the fact that we have missed part of the action.But actually the black moments are so short makes us think that we are watching the full motion.
Components Of Animation.
Keyframe:Keyframes define the moment in the timeline where actions or animations occur.
Playhead:The playhead shows the current frame that we are viewing in the timeline.
Blank Keyframe:A blank keyframe is an empty location on the timeline which is ready to have the contents placed.
Frame View:The Frame View allows you to change how the timeline is displayed.
Layers:Layers organize your work from back to front on the stage so that one object can move in front of other one.
Current Frame:This displays the current position of the playhead.
Frame Rate:This shows the number of frames per second (fps) our animation will play in the browser.
Elapsed Time:Shows the time elapsed from Frame 1 to our current position at the selected fps.
Flash Movies can refer to three different kinds of files:
Mymovie.fla File type:Project
This always has an extension of .fla and is the master authoring file used to edit contents.
Mymovie.swf File type:Movie
This always has an extension of .swf and is the only kind of file you will upload to the Internet.It is a compiled version of your project.
Mymovie.exe File type:Windows projector A stand alone projector file for viewing on a windows computer.
What to know more about flash??Have a look at my upcoming blogs about flash.Till then take care and thanks for reading.
Saturday, June 27, 2009
Drawing and Coloring Tools in Flash
So how have you been??Today I will be telling you about how to use the drawing and coloring Tools in Flash.Flash hs its own set of tools.Most of these would be familiar if you've worked on Ms-Paint or any other paint program.Flash produces images that are Vector based,some of the functions will be different.Different types of tools in flash are-:
The Arrow Tool:Helps to select a object easily.
The Line Tool:Creates straight lines.If you hold down the Shift Key you will get lines that are at a 45 degree angle.
The Lasso Tool:Allows us to select an object or a piece of an object by clicking and dragging around it.
The Pen Tool:Creates a straight or a curved line.
The Text Tool:Allows you to add text fields to your movie.
The Oval Tool:Creates circles and ovals.If you hold down the Shift Key then you will get a perfect Circle or Oval.
The Rectangle Tool:Creates squares and Rectangles.If you hold down the shift key you will get a perfect squre or rectangle.
The Pencil Tool:Draws lines in three different modes:straighten,smooth & ink.If we hold down the Shift Key you can create perfect horizontal and verticle lines.
The Brush Tool:Creates shapes with fills only.
The Free Transform Tool:Allows you to modify objects.With the tool you can scale,rotate,flip & skew the object.
The Fill Transform Tool:Allows you to change the size,direction or center of a gradient or bitmap fill.
The Ink Bottle Tool:Can be used to change the colour or width of a line or to add a stroke to a shape.It will not change the fill of a shape.
The Paint Bucket Tool:Adds a fill inside the shape or changes the color of a fill.
The Eyedropper Tool:This tool is used to copy the fill or stroke attributes ofan object and apply it to another object.
The Eraser Tool:This tool is used to remove unwanted areas on the Stage.
Hope this information helps you while you are working on Flash.I shall surly tell you more about Flash and how to use these tools to make animated movies.Till then take care.
Friday, June 26, 2009
Basic Of Flash
Today I will be telling you about flash.Flash is one of the important elements for making a website look good.Now you must be thinking that what is flash.Let me tell you that flash is a technology that allows web designers to create animations and interractive movies,which can then be embedded into their web pages.HTML is ideal for creating web sites where text and images are placed at fixed portion.But it doesn't really support dynamic sites,where text,images and animations are moving around the screen.
Advantages of Flash.
* Flash is useful for vector graphics.
* Flash movies can be stored in very small file size,Therefore they can download and start playing rapidly.
Types of files that flash uses.
There are three important file types need to understand in flash:
Source Files (.fla):This is the source Flash movie that we save while working.This file has an extension .fla.It means any file with .fla extension can be opened and edited.
Exported files (.swf):This is a Flash Player file.When we finish with editing of our source file and are ready to distribute,we simply export an .swf file 'Flash Player File'.This file can be viewed on any Internet Browser with Flash Player plug in.The viewer can only watch it but is not allowed to edit it.
HTML files (.htm):HTML files in Flash contains all the details about pictures that are supposed to be seen on the web page as image file name,location address etc.
Today I will be telling you this much only and shall be updating you about the advanced flash in my upcoming blogs so keep waiting.If you have any inqures you can leave a comment or e mail me at ranibhardwaj31@gmail.com.
Thanks for reading
Sunday, June 21, 2009
Anchor tags
Hello
So today I will be telling you about what are anchor tags.I think that the first thing that must have come to your mind is How to use anchor tags or what are anchor tags.
Anchor tags are tags which are used to link one website/webpage to another.The tag used for anchor tag is ‘a href’. Please note that instead of these’’ use < > angular brackets.For example if you wish that your website/webpage should be linked with my blog you can give a tag of and my blogs link that is http://htmlforbeginnerz.blogspot.com. Like I am linking my site with google with the tag a href.http://www.blogger.com/www.google.com.So hope that you got to know what are anchor tags and for what they are used.If you have any inquires or douts you can leave a comment or e-mail me at ranibhardwaj31@gmail.com.
Thanks for reading!!
Saturday, June 13, 2009
HTML Tags
Today I shall be telling you about what are HTML Tags.HTML Tags are codes which help you to get your text the way you want!Like if you what you that the text you have written should be bold or italic or if you want to insert images.So the different types of tags/codes are as follows-:
1.If we want to make our text bold we use 'b' or 'strong' to open and '/b' or '/strong' to close.For example HTML Codes.
NOTE-:Instead of these '' use angular brackets <>.
2.If we want to make our text italic we use 'i' to open and'/i' to close.For example HTML TAGS.
NOTE-:Instead of these '' use angular brackets <>.
3.If you want to make your text underline we use 'u' to open and '/u' to close.For example HTML CODES.
NOTE-:Instead of these '' use angular brackets <>.
4.If you wish that your text should be both bold and underlined we use 'b' 'u' '/u' '/b'.Remember that whatever comes fist closes last.For example Have a good day.
NOTE-:Instead of these '' use angular brackets <>.
5.If you want that the text should be center aligned we the 'center' tag to open and '/center' tag to close.
NOTE-:Instead of these '' use angular brackets <>.
6.If you wish to upload a image you can use the'img src=path of image'.
NOTE-:Instead of these '' use angular brackets <>.
7.If you want that your text should move you can use the 'markquee' tag.
NOTE-:Instead of these '' use angular brackets <>.
8.If you wish that you text should be in a paragraph you can use 'p' tag to open and '/p' tag to close.
NOTE-:Instead of these '' use angular brackets <>.
9.If you wish to delete text you can you 'strike' tag.
NOTE-:Instead of these '' use angular brackets <>.
10.If you want that your text should come in the next line you can use the 'br' tag.
NOTE-:Instead of these '' use angular brackets <>.
11.If you wish that your text should be big use 'big' tag.
NOTE-:Instead of these '' use angular brackets <>.
12.If you wish that you text should be small yse 'small' tag.
NOTE-:Instead of these '' use angular brackets <>.
13.To place a short description of the picture in the background which becomes visible on placing the mouse cursor on it we use 'alt' tag. The tag 'a href ' stands for anchor reference text.
NOTE-:Instead of these '' use angular brackets <>.
14.If you wish to emphsis text you can use the 'em' tag.
NOTE-:Instead of these '' use angular brackets <>.
These are the majour tags that are used in HTML.Now many people ask that if there are keybord shortcuts for these tags.Yes there are keybord shortcuts like if you want to make text bold you can press Ctrl+b or if you like to make your text italic you can use Ctrl+i and so on.
If you have any problems or did'nt understood anything you can leave a comment or e mail me at ranibhardwaj31@gmail.com. I shall surely replay your equires.
Thanks for reading!
Friday, June 12, 2009
Basic Of HTML
So many people ask that what does HTML stands for HTML stands for Hyper Text Markup Language.I shall be telling you the history of HTML.HTML was developed a few years ago as subset of SGML (Standard Generalized Mark up Language) which is a high-level markup language that has been used by the Department of Defence.Like HTML,it defines different components of a document and describes formatting and hypertext links.If you want to make a website or a webpage you must know what is HTML and how to you use HTML.To create a website you can use Macromedia Dreamweaver and Microsoft Frontpage but the best way to create a website is to use your own HTML codes but while you are making your website it is very necessary to write proper KEY WORDS.Search Engines like Google,Yahoo,MSN look at your keywords and rank your websites accordingly.The appropriate your keyword is the higher your ranking is and more you get traffic on your websites.For any information you can leave a comment or e mail me at ranibhardwaj31@gmail.com .Thanks for reading!